Photoshop CS4 Extended Improved Count Tool
By Eric Wexler
The count tool in Photoshop CS4 Extended has been improved since its introduction in CS3. One can create differing sets of counts, turn visibility on and off selectively and most importantly can save the counts with the image. These changes give the user doing manual counting more power and the ability to track multiple sets in a single image. In addition options for the size of both the marker and text can be controlled within a permissible range.
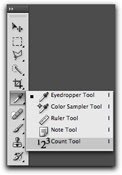
The count tool is located with the eyedropper tool which has been moved to the top forth of the tools bar. This gives the new 3d tools room at the bottom portion of the tool bar. The count tool is also available under the analysis menu item like it was in CS3 Extended.

The option bar give you access to the count tools new abilities. Instead of the dearth of control that was CS3’s count tool, you have a multitude of controls. From left to right first is the tool preset control but this is of no use because at the time then user is unable to define presets for the count tool. I hope in the future that this is turned on because of the ability to create count tool conditions and apply them on different image sets repeatable and easily.
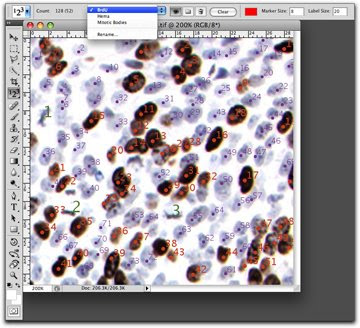
Next is the running total that displays the sum of all the counts and the current selected count group in parenthesis. The next set of controls gives you control over the counting groups. The pull down selects which group is active and gives the option to rename the groups so you can label it properly. To the right are the four control buttons. The eye turns visibility on and off for the selected group, the folder creates a new count group. The trash can deletes the selected group then the clear button removes all counts of the current group without deleting the group itself.
The last part of the option bar controls the display of the labels. The ability to selects any color from the color picker, an ability to control the size of the count mark from an arbitrary 1 to 10, and the font size of the number from 8 to 72.
With these new features the many more workflows are available to use the count tool. One such workflow I will cover is the count and tracking of three sets of cell types in a photomicrograph. The image is a tissue section from a cancer tumor.
With the image open select the count tool under the eyedropper/sampling tool. To active the options at least one count label must be conducted. Once a count has occurred the option become active and you can create the count groups needed by clicking on the folder. This gives a dialogue box to name the group. Just repeat to add more label groups. All the groups will be displayed in the pull down menu with the first group that still has the generic name. The active group will have a check on its left when activated. Now use the rename command to change the name of the generic group to something more suitable.
Now with the groups created and labeled we can start counting in the image and select a color and size to increase visibility of the marker. The actual display of the counts are tool based and don’t reside on any particular image layer. The advantage is that the image layer can be modified or replaced without changing the label display. The downside is that there is a minimum of control to the numbers. You can’t create layer styles or do any other layer manipulation that you want to like changing opacity.
To make the most of what you can each label group can have different colors, marker size and font size. This helps discriminate between the sets and make it easier see the results. There are some built in tricks to help label. On a dark background the tool will be white and on a bright background the tool will be black. The mark will be placed on the cross hair position.
Additional counts will be added to whichever count group is active. After all items are counted and labeled the data can be put into the measurement log and the labels can be saved with the image. Only the total sum of all the sets count the count In fact an image can be reopened and counting can continue. Other imaging program won’t see the count tool results but as long as the image is within Photoshop CS4 extended you are ok
An issue with the count tool is that the labels once positioned can’t be moved and fall off the viewable area of the image. If you enlarge the canvas to try to include all visible aspects of the label; the overall position of every count marker moves. To avoid this it is important to enlarge the canvas prior to performing the count. Another thing to be aware of is the labels are included in the histogram so remember to turn of visibility before collecting histogram data.
Additional workflows are possible with the new count tool abilities. The changes make it easier to conduct manual counts and relay o n a single image to multiple sets of items in a single image. Good luck and best wishes in using the count tool to get your work done.
Count tool issues to be aware off
Measurement log doesn't track label group results
Resizing canvas moves position of labels
Count labels are including in histogram data
Can turn on/off layer visibility to leave only the markers visible
Labels visibility would be nice to have on/off all at once
If the file type comes in via Adobe Camera Raw the count labels are lost
This article is based on prerelease version of Photoshop CS4 Extended and things may changed. For other researchers consider the information as a starting point to understand the features and how it may be used. Any workflow or procedure for your own use should be validated prior to data collection.
Eric J.Wexler is a research scientist with a focus on drug discovery. During his twenty-year career in the pharmaceutical industry he developed and validated imaging methods supporting his own research as well as work for other scientists in the fields of cardiovascular disease, oncology, stroke, and medical imaging. He is a member of Adobe’s Biomedical Image Advisory Group. His training Photoshop CS3 Extended for Biomedical Research can be viewed at www.lynda.com.
Any comments or suggestions are welcome.
ericjwexler(Atsymbol)yahoo.com

No comments:
Post a Comment